
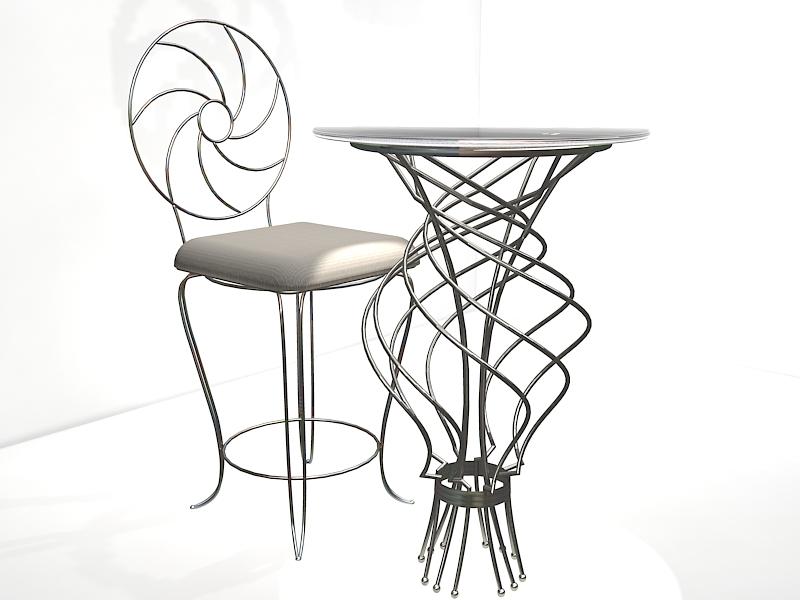
It's in no way a perfect render, but this was the 3d scene that I was referring to in my Zone post. This set was modeled by me which I did so by referring to this real world collection here. The collection consists of a Spiro Bar Stool, a Bistro (italian for pub) Table and a Spiro Tea cart. Found this one after googling for table sets images and loved the simple elegance.
I posted a small tutorial on this in a small forum because, though simple it is, the table seemed to be baffling to one of the members. So, I am posting the tutorial here too, incase someone reading this needed a pointer on how I made this. So here goes.
At first attempt, I struggled a lot not knowing how to create the table. Here's my preliminary attempt:
This picture, which is grossly wrong, was pretty difficult for me and was made as shown in this screenshot:
 I first created "guide circles" (those scaled up circles in the side views.). Then in the front view I drew a line with as many vertices as there are guide circles from the bottom circle to the top one. Then in the top view I just moved the vertices of the line so that it conformed to each circle at different angles. It's kinda difficult to explain but I guess u will understand from this. This method was so tedious and error prone that I was struggling with it for more than an hour.
The later, more faithful, version of the table was made this way:

I just created the four inner, curved legs that u can see to set the scale of the table. Then I drew out a Helix on the top view and modified its height in the side view so that it forms a good shell over the four rods (For the helix parameters, see the above screenie). Then, I edited the helix at the bottom side to make it look more like the one in the reference photo. Since in the reference table there are 4 legs with two helix per leg, I rotated and cloned the helix 45deg seven times.
This method only took me 5 minutes to make this table.
Actually, the entire scene is made from lines (well, splines) that were given a renderable thickness value. It would've been difficult to the same with 3d solids.
For the material, I used the default Brushed metal. The rendering environment was set to uffizi_probe.hdr from debevec.org. If u had tried to learn to light a scene, you would've known that lighting is so tuff. So I didn't bother much with it. Just used one sunlight with final gather set to 700. This means you don't get to see sharp Caustics and control over shadows, but this method has, as I found out, the best mix of realism and speed.
For the cloth, I just used the default "carpttan.jpg" as diffuse and bump in an architectural material with template set to 'Fabric'. It is my default way of creating a cloth. For the cushion, I used a chamfered box with meshsmooth and a lot of fillet segments.
Hope it helped someone. (I know this is expecting too much as I don't have a lot of readership, but I've got to keep alive the hope.)
No comments:
Post a Comment